If you’ve ever experienced a keyboard typing on its own, you know how frustrating it is. Well, there are many reasons why your keyboard is typing automatically like software glitches, hardware malfunctions, malware infections, and so on. In this article, we will show you the 9 best ways you can fix keyboard auto typing on Windows.
Whether you are experiencing this problem with a desktop or laptop, the solutions mentioned in the article will help you resolve the issue and get your keyboard working properly again as long as it isn’t a hardware issue. However, if nothing works out, it is better to buy a new keyboard or repair the existing one. Let’s get started.
Note: The steps executed in this article are on Windows 11. The steps may differ slightly if your device runs on Windows 10 or below.
1. Check for Keyboard Hardware Issues
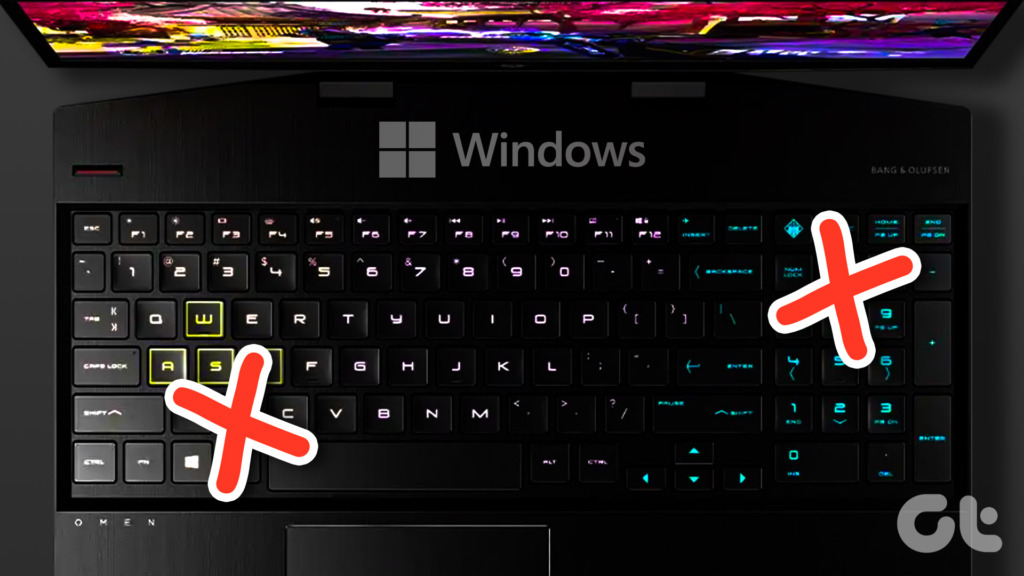
One of the most important things before starting to change settings on Windows is to check if there are some hardware issues, especially when using an external keyboard. To start with, check if keys are stuck while being pressed; if not, try disconnecting the keyboard and reconnecting it.
If disconnecting and reconnecting didn’t solve the problem, check if the ports are connected properly and clean them. You may also inspect whether the keyboard cable has any potential damage. If everything looks good physically, there could be an issue with Windows, then move to the next method.
2. Restart your Windows Device
Sometimes, a general restart can help fix the glitches with your Windows or connected devices. When you restart Windows, it closes all the running programs and processes and starts afresh.
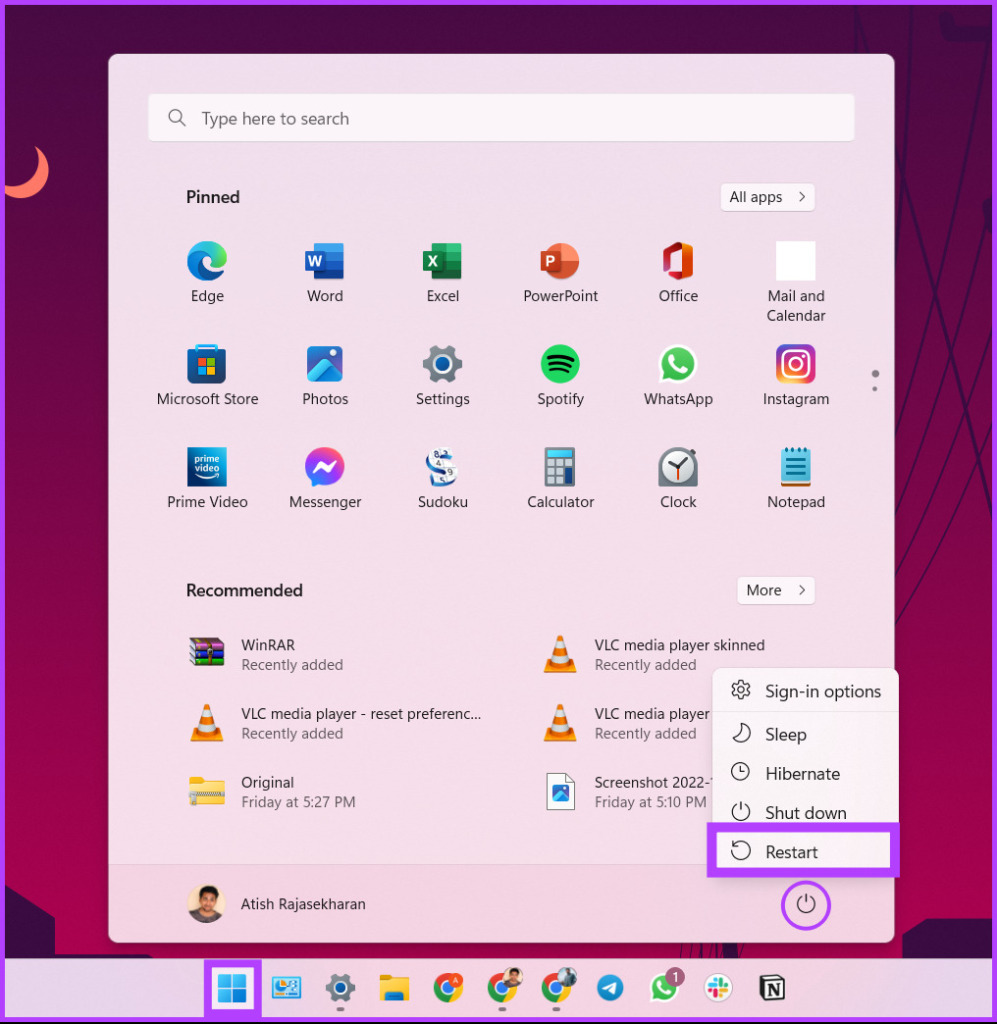
To restart, you must press the Windows key on your keyboard, click on the Power icon, and select Restart. That’s it! When your PC restarted, check if the issue got resolved. If not, maybe the next method will help you.
3. Update Your Windows Keyboard Driver
If restarting didn’t stop the keyboard from typing on its own, there’s a chance that the keyboard driver may not have been installed correctly or may be outdated. Follow the steps below to fix it.
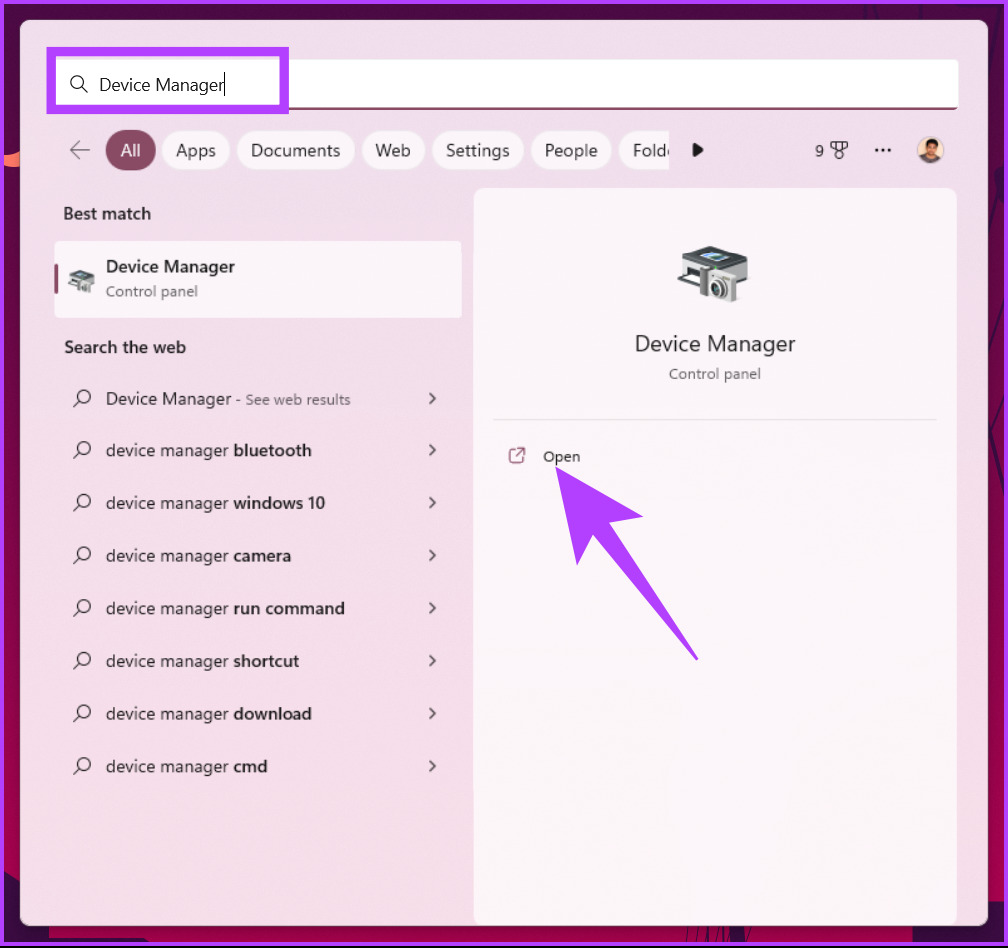
Step 1: Press the Windows key on your keyboard, type Device Manager, and click Open.
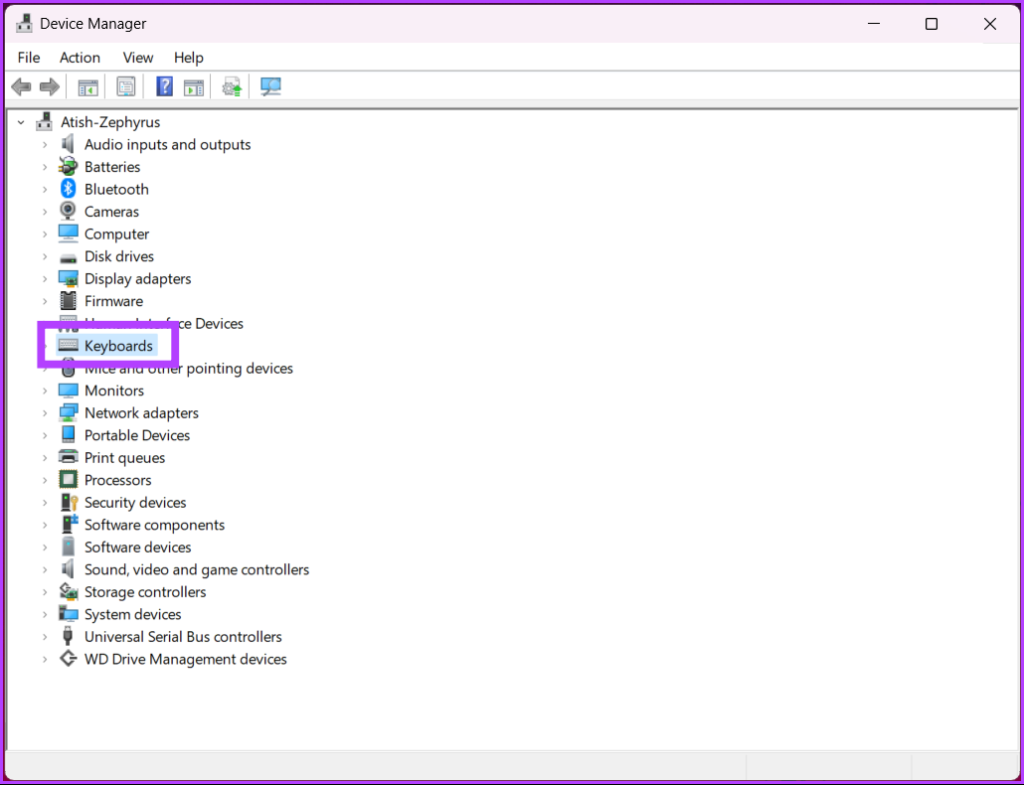
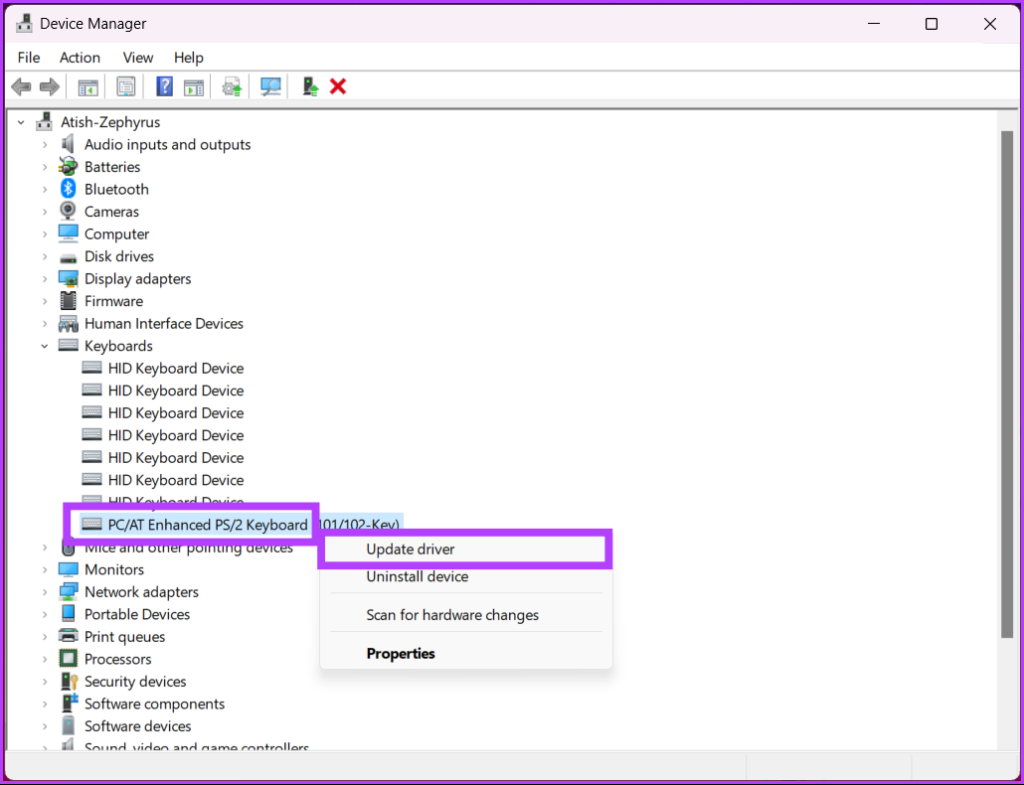
Step 2: Go to Keyboards.
Step 3: From the drop-down menu, choose the keyboard, right-click on it, and select Update driver.
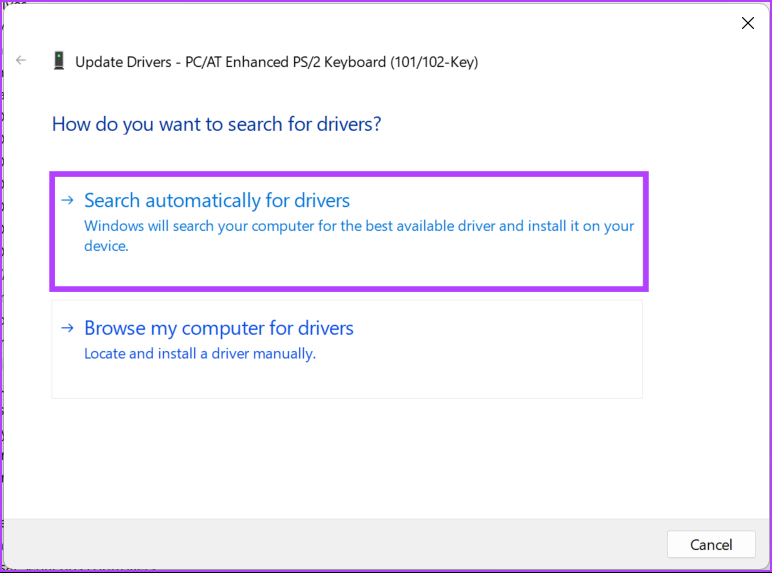
Step 4: Now, click on ‘Search automatically for drivers.’
Windows will automatically check and update the drivers. Once the driver is updated, restart your computer and check if there’s any change in your keyboard behavior. If this didn’t help, go to the next method.
4. Run Keyboard Troubleshooter
Troubleshooters are a core part of Windows that help diagnose and fix problems with various features and components of your computer, including keyboards. Follow the below-mentioned steps.
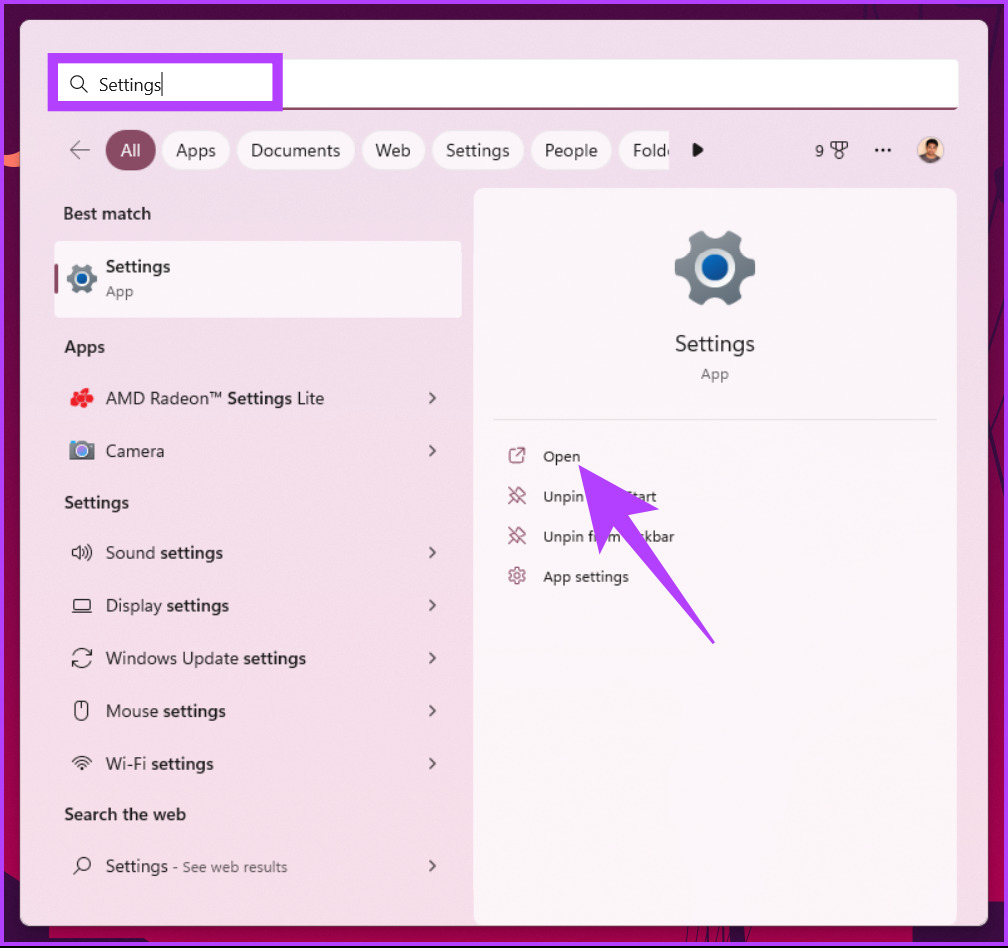
Step 1: Press the Windows key on your keyboard, type Settings, and click Open.
Note: Alternatively, press ‘Windows key + I’ to open the Settings app.
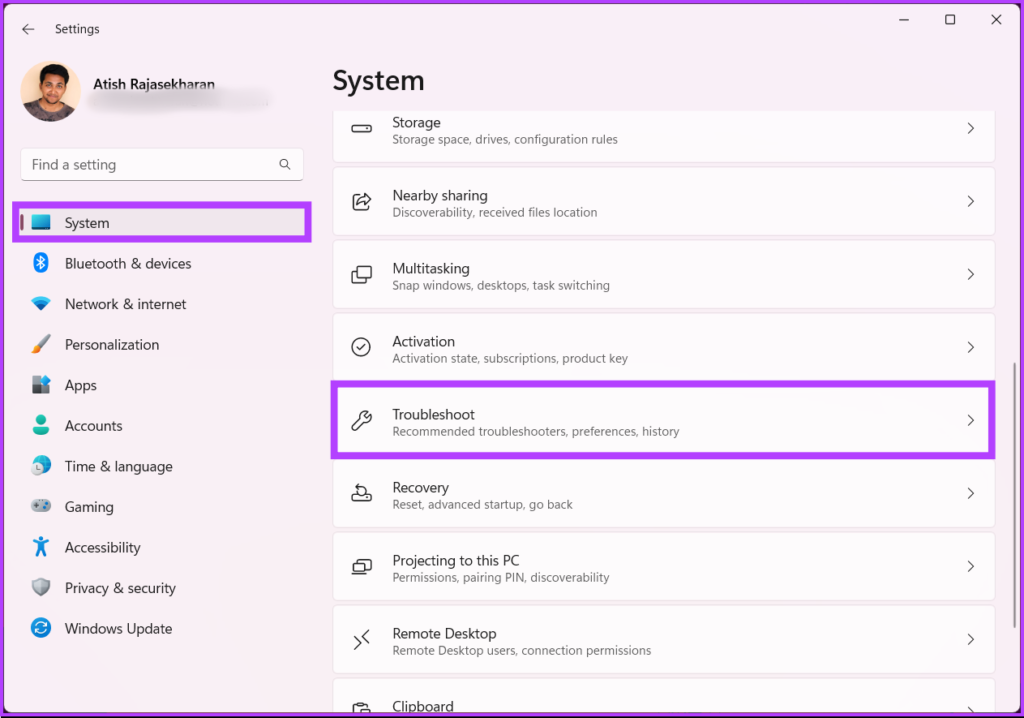
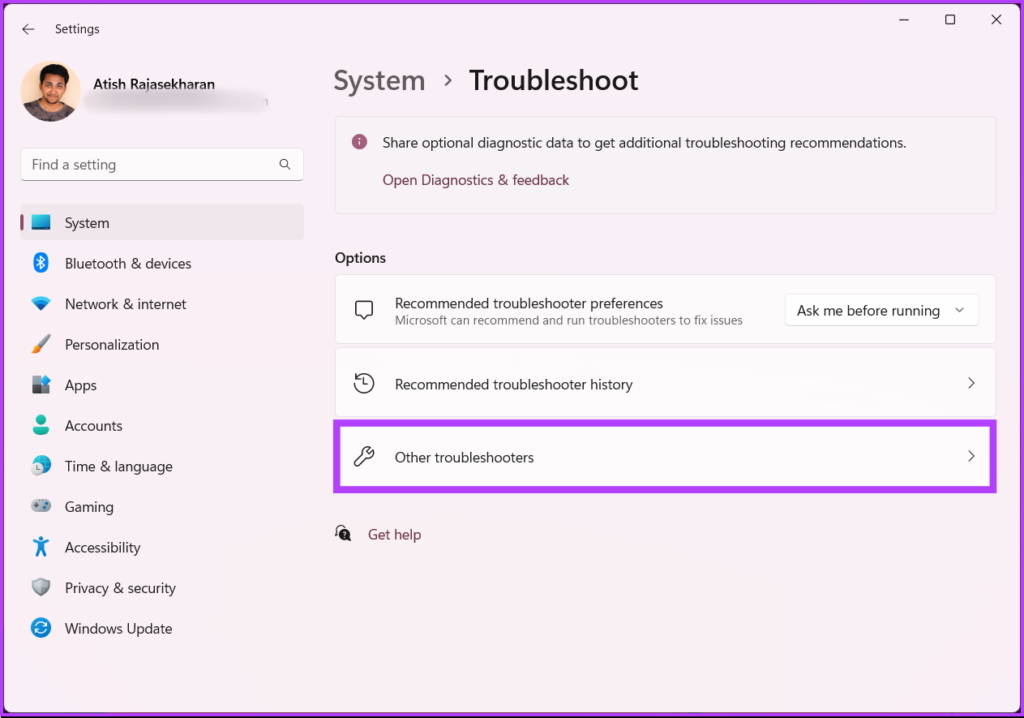
Step 2: Under System, scroll down and click on Troubleshoot to open it.
Step 3: Select Other troubleshooters.
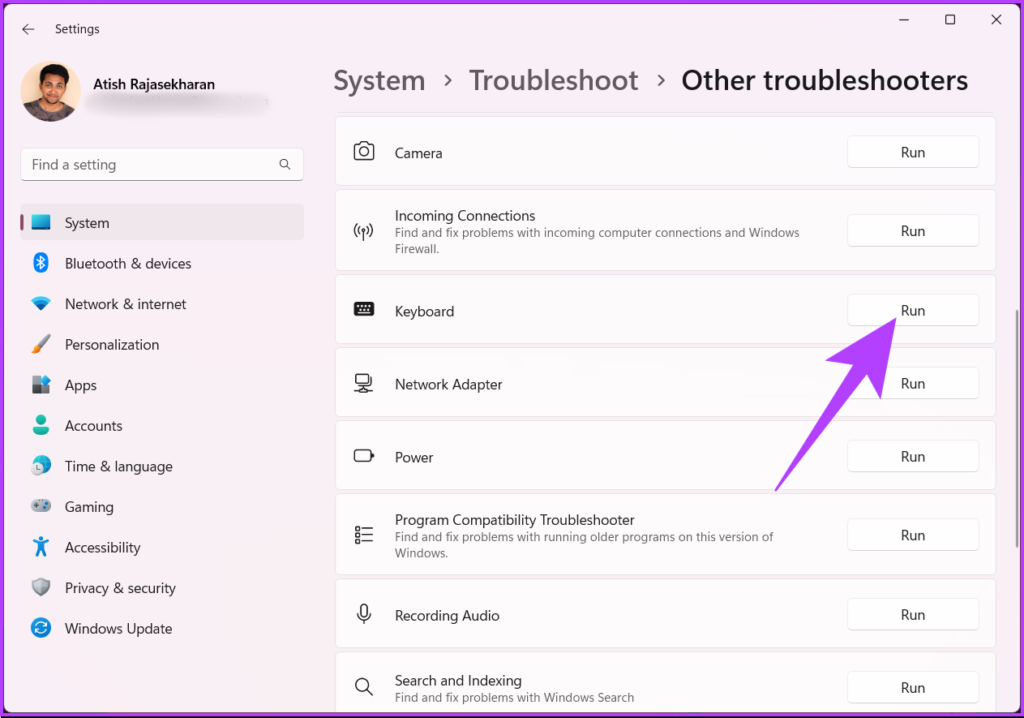
Step 4: Under Other troubleshooters, locate Keyboard and click the Run button.
Follow the on-screen instructions and let the troubleshooter detect and diagnose the problem causing the keyboard to press random keys. If the troubleshooter couldn’t detect any issues, it’s time to change the keyboard settings.
5. Reconfigure Keyboard Settings
A small tweak on the keyboard setting fixes the keyboard auto typing on Windows PC issue forever. Follow the below instructions.
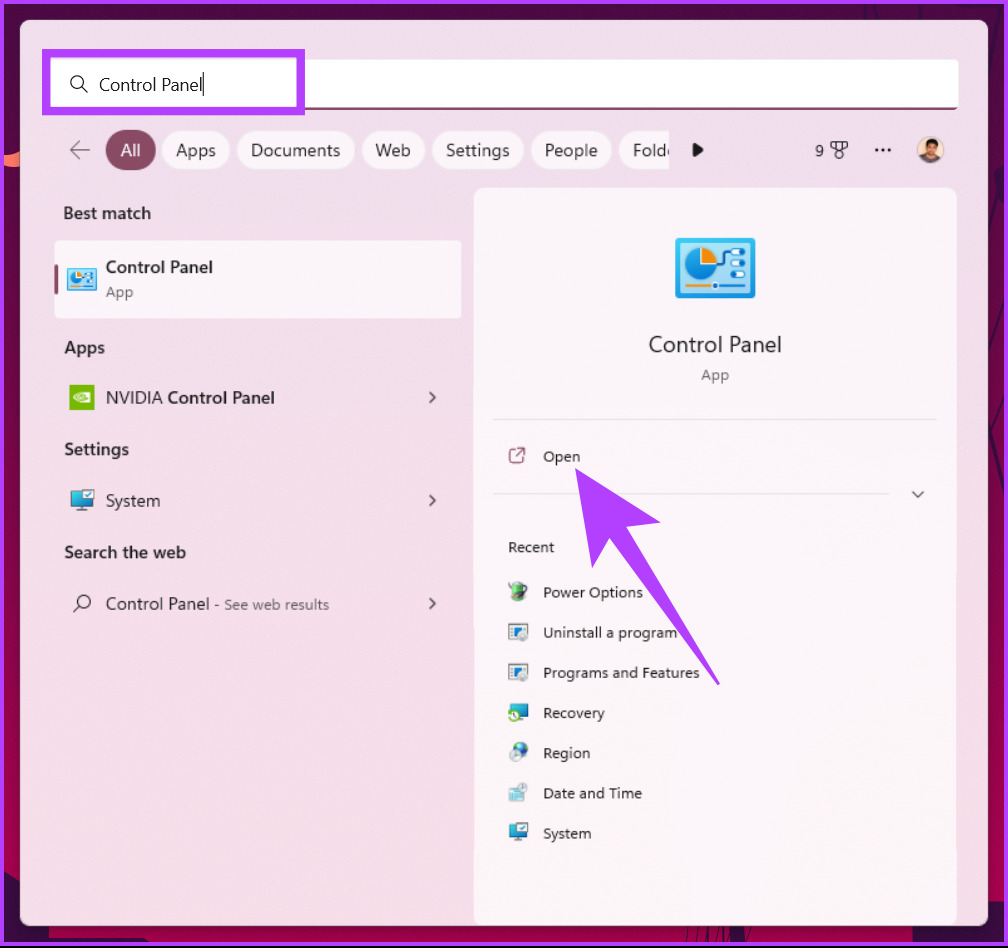
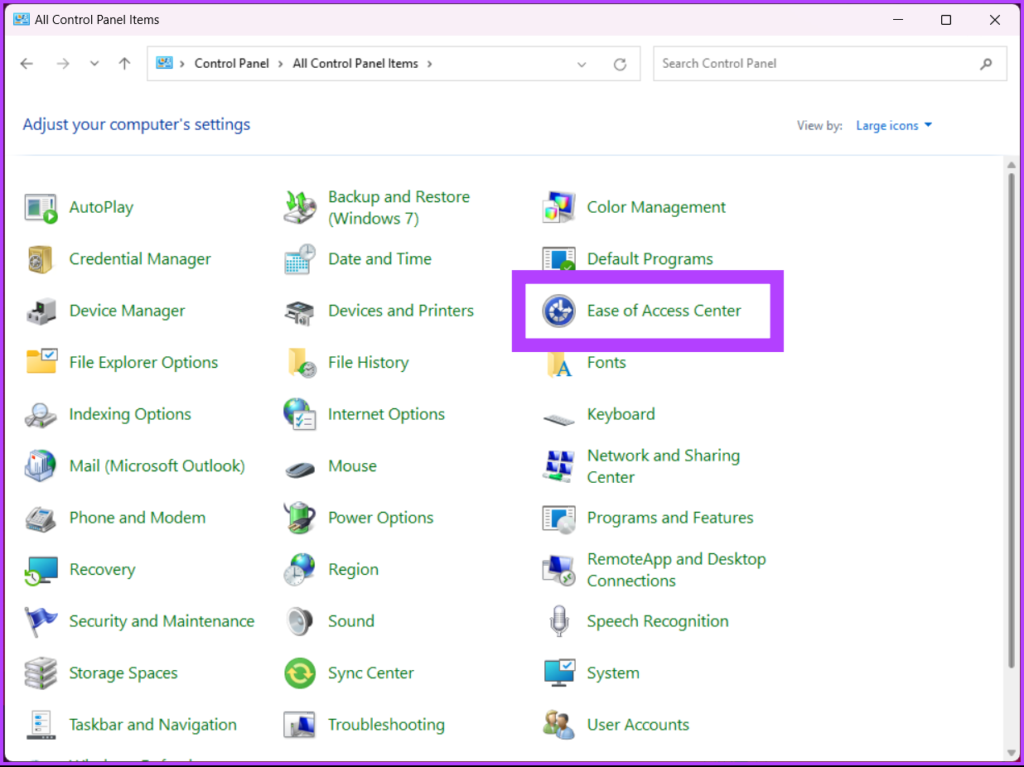
Step 1: Press the Windows key on your keyboard, type Control Panel, and click Open.
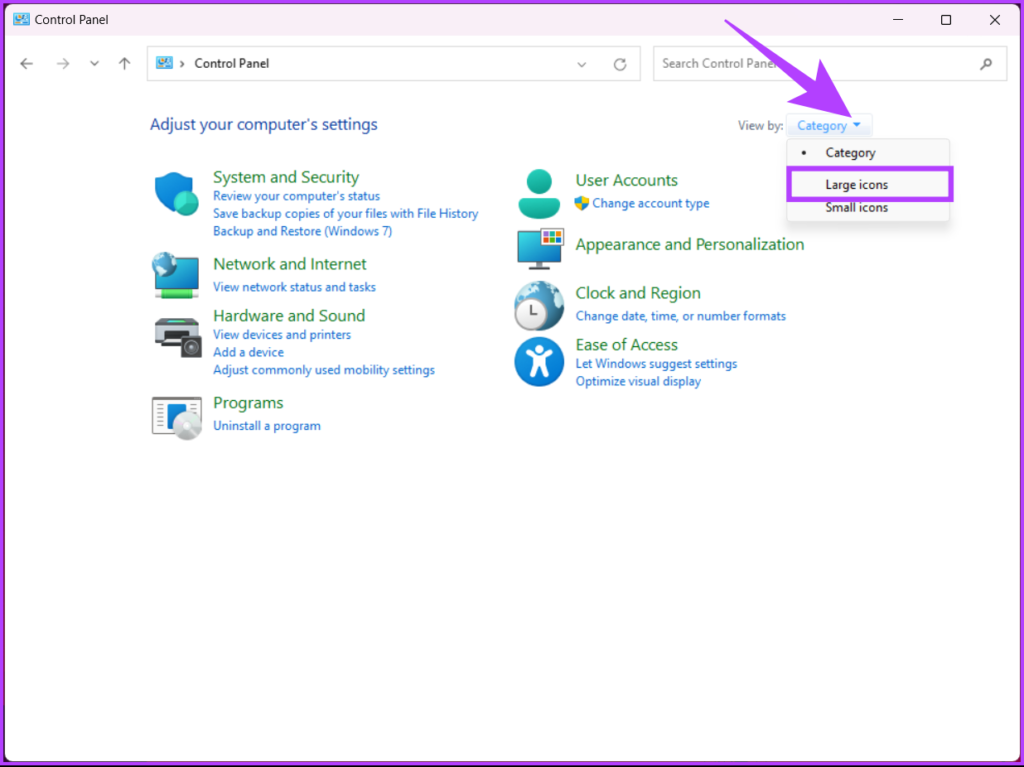
Step 2: Click on the drop-down next to View by and select Large icons.
Step 3: Now, click on ‘Ease of Access Center.’
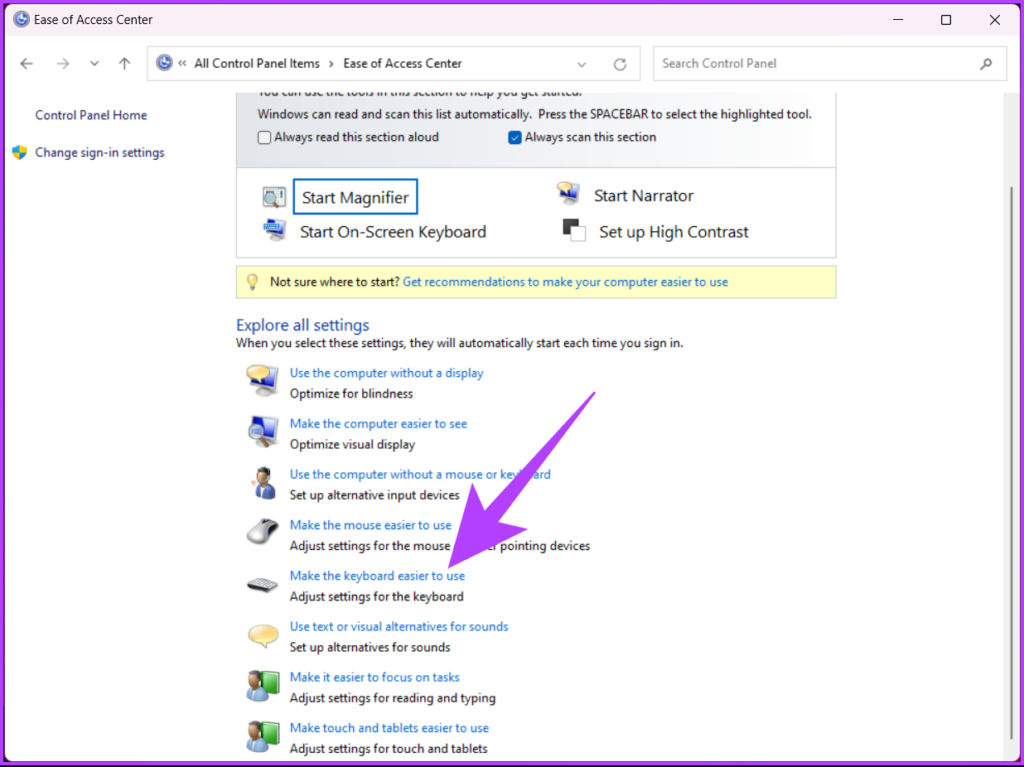
Step 4: Navigate to ‘Make the keyboard easier to use’ and click on it.
Step 5: Uncheck ‘Turn on Mouse Keys,’ ‘Turn on Sticky Keys,’ and ‘Turn on Filter Keys.’ Next, click Apply followed by OK.
After changing the settings, your keyboard should function correctly. If you don’t see any changes, restart your computer and try again. If there’s still no change, move to the next method.
6. Run a Malware Scan
Sometimes, it’s not the keyboard or Windows settings that cause ghost typing or phantom typing issues; malware that may be interfering with hardware devices can also cause this issue. We have extensively covered how to check malware using Windows Defender.
However, for the sake of this article, we will demonstrate how to do a full scan on Windows using PowerShell. Follow along.
Step 1: Press the Windows key, type PowerShell, and click on ‘Run as administrator.’
In the prompt, click Yes.
Step 2: Type the following command to start a full malware scan and press Enter.
start-mpscan -scantype fullscan
The Full Scan option in Windows Defender goes deep into your system files and programs to look for malware. So, depending on the amount and type of data that needs to be scanned, the full scan takes some time to complete.
If malware scanning or detecting didn’t help, move to the next method.
7. Fix Ghost-Typing Using the System File Checker
Hardware glitches can arise from anywhere on Windows, which may lead to the keyboard automatically typing. One reason could be the System Files that may hamper the working of hardware devices connected to your Windows PC. Follow the below steps.
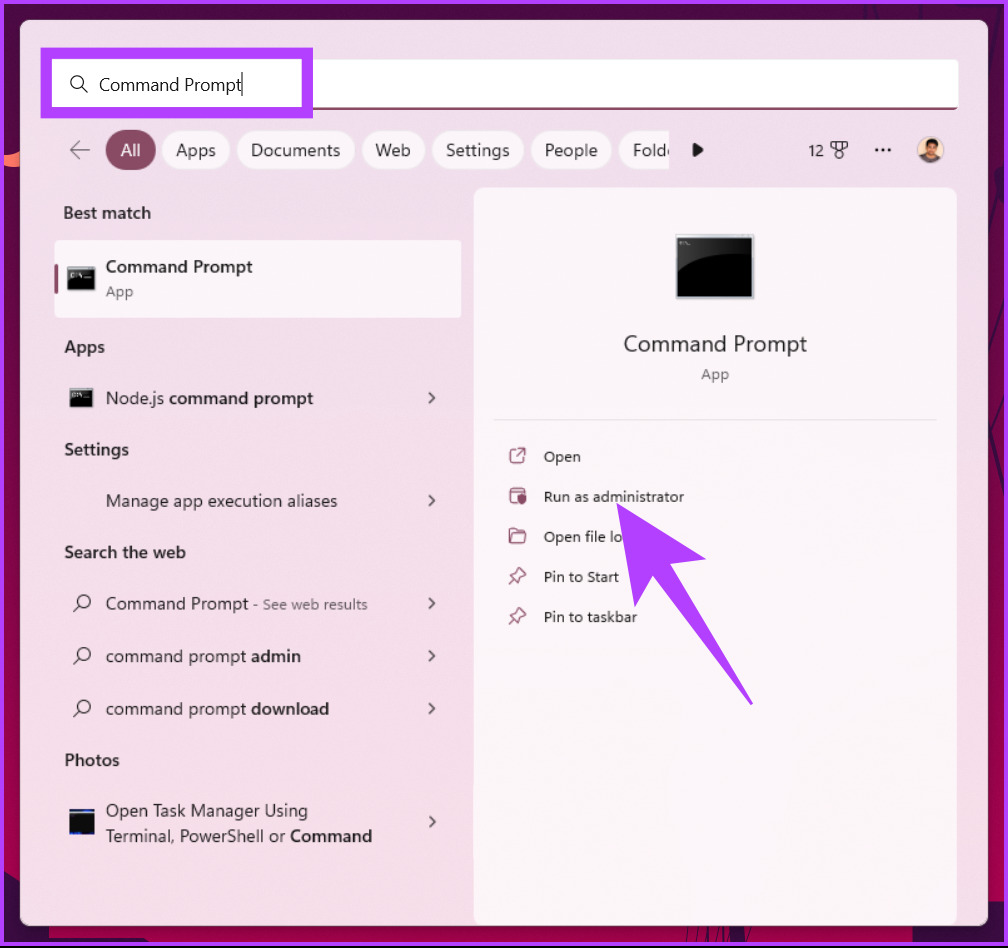
Step 1: Press the Windows key on your keyboard, type Command Prompt and click ‘Run as administrator.’
In the prompt, click Yes.
Step 2: Type the below command and press Enter.
sfc /scannow
With that, your PC will start the verification process. Once it detects any issues, it automatically removes and updates.
8. Update Windows Operating System
Sometimes, the compatibility issue leads your Windows PC’s keyboard to act weirdly. A simple Windows update could fix this issue. Follow the steps below.
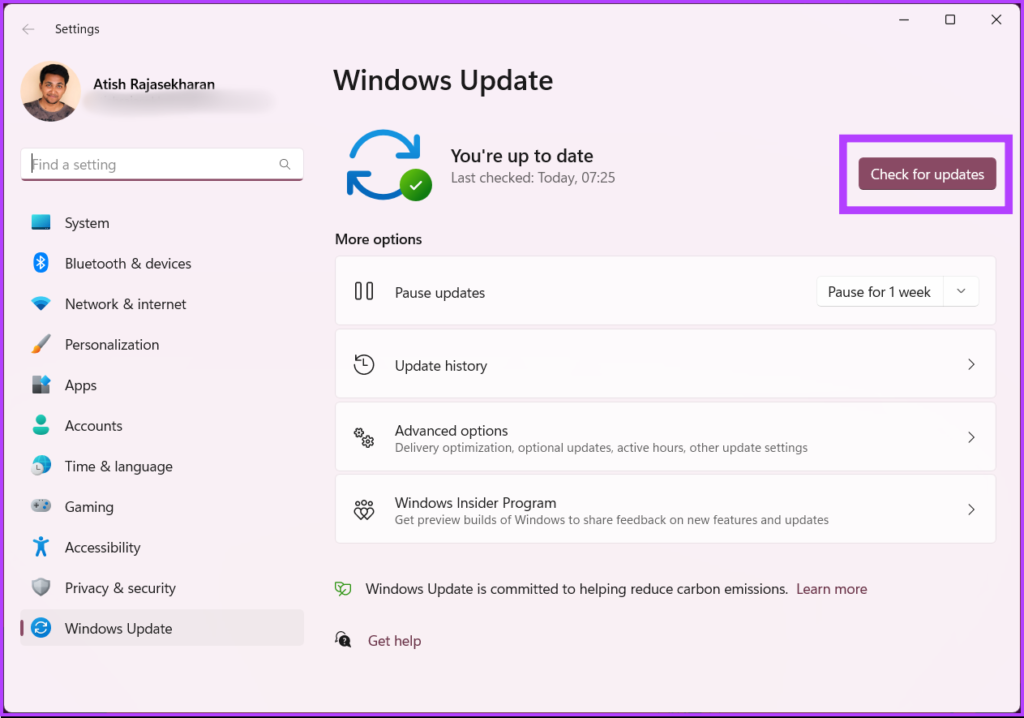
Step 1: Press the Windows key on your keyboard, type Windows Update Settings, and click Open.
Step 2: Click on ‘Check for updates,’ and install the update once it gets downloaded.
This update should fix the auto-typing issue on your PC. On the flip side, if the issue had arisen from the Windows update, there’s a high chance that rolling back to the older Windows version would resolve the issue. If not, move to the last resort.
9. Replace the External Keyboard
If no method mentioned above helped you, chances are there’s some issue with your external/internal keyboard. You may want to switch to the in-built keyboard or vice versa. If nothing works, switch to an on-screen keyboard or buy a new external keyboard until you fix the hardware issue.
FAQs on Fixing Keyboard Auto Typing on Windows
It is an option in Windows that allows users to enter certain keyboard shortcuts using the keypad rather than pressing multiple keys simultaneously. In the case of a physical disability or other condition, this can make it easier for users to press multiple keys simultaneously.
If you press the Shift key five times in a row on a Windows computer, it will enable or disable the Sticky Keys feature.
The ghost keys are caused by phantom keys, also known as ghosting. When pressing one key, multiple keys appear to be pressed at the same time. As a result, incorrect characters can be entered when typing or entering data. Hopefully, the solutions in this article should help you fix this issue as well.
Get Rid of Your Keyboard Issues
We have listed all the possible solutions to fix the keyboard auto-typing on your Windows device. Restarting the operating system and checking for updates are often the most effective ones. If we missed something, let us know in the comments below.

